


Illusionyary
Members
-
Joined
-
Last visited
Everything posted by Illusionyary
-
-
-
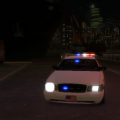
![[WIP] Pinellas County Sheriff Tahoe](//s3-gallery.int-cdn.lcpdfrusercontent.com/gallery/album_2838/sml_gallery_120090_2838_159062.png) Yes, that is enough. If you have an issue with one another please take it to PM and sort it out.
Yes, that is enough. If you have an issue with one another please take it to PM and sort it out. -
That was a rather disturbing watch, he was seriously fucked in the head.
-
Hopefully that made sense, I was half a sleep when I posted. Let us know how it goes!
-
I love the look of the grill and headlights!
-
The glass and model itself (not the extras) go in the bonnet section if you want them to move with the bonnet (and not float when you open the bonnet). As NoBueno007 said, just make sure the extras are above the glass/model (lighting equipment model, not the car itself).
-
If you have multiple extra files (which you will if you're running more than one set of lighting equipment) you'll need to attach the conflicting extras to each-other, I have a tutorial for this. The RC20 error is usually caused by the vehicle .wtd (textures) file. Try deleting all the textures in that vehicles .wtd file (ex. police.wtd) in OpenIV and re-importing only the ones you used on the vehicle.
-
You're welcome, glad to be of assistance!
-
 The economy is hitting people pretty hard! Gotta do what ya gotta do!
 -
Select the parts you want to move, enter Polygonal Mode (making sure Selective Mode is on), double click on the display window, select the parts again and now move them. Everything will stay in its original position. Once finished, re-enter Object (default) mode. Polygonal Mode Box
-
GameSpy has nothing to do with Games For Windows Live, last I heard it was only GFWL's marketplace and some other useless features that were going down, not the servers.
-
 Why stop? You could of easily outran that Crown Vic.
 -
I don't think it has a specific name. Vertical flag perhaps?
-
Outdated/low spec PC parts, graphical, player and vehicle modifications. No, deleting other games will not give you an FPS boost, the only thing that will do is free up hard drive space. EDIT: Damn you ineseri.
-
 Nope, I fixed it! :D Thanks! Unfortunately this model is private, but you may see it become public in the future (no guarantees though, it's not my model so I don't have a say).
 -
This tutorial only applies to vehicles with multiple extras. Once we have the vehicle setup to our liking, we'll want to attach the extras together so ELS will actually work in-game. First things first, check to see if the lighting equipment has any "helper" (or similar) folders within the main folder itself. As you can see, there are two helper folders here. Drag these helper folders out of the main equipment folder (in this case WhelenEdge and Whelen_Talon) above the vehicle model (police.wft). Once the helper folders are no longer inside the main equipment folder(s), proceed to delete the equipment folder(s) (this is not a requirement, but it keeps things tidy) by right clicking on the folder and selecting edit/delete. Open up the helper folders, as you can see there are multiple extra 1 and extra 4 folders. These are what we will be attaching (only attach the extras if there is more than one set). At this point, decide which light bar will be the "main" one you will attach everything to. For this tutorial, I have selected the Whelen Edge (the second helper folder) as the main light bar. Open the extra folders, inside you should see a extra_L0 file. Drag the extra_L0 files out of this folder and into the main light bar (WhelenEdge) extras folder. You should now see duplicate extra_L0 files. Right click on the main light bar folder (WhelenEdge) and select "Show isolated", this will hide all other layers/folders but the one selected. The hierarchy and view panels should know look like this... and oh no! The car is gone! Don't worry, this is perfectly fine. Now hide the main light bar base (the actual bar itself, not the extras - these should be named differently). You should end up with a view like this. Under the tools tab on the left hand side of your screen, click on modify and then click attach. Making sure Selective Mode is off (keyboard shortcut - space-bar), attach the extras to each other (extra_1_L0 to extra_1_L0 and extra_4_L0 to extra_4_L0, ect) by clicking on the secondary (talon) extras and selecting the primary (edge) extras. The duplicate extra_L0 files should now disappear from your hierarchy. This means you have successfully attached the extras together. Right click on the main light bar and click "show the rest". This should reveal all hidden layers/folders. The extras folders (where you took the extra_L0 files from) can now be deleted (once again, this isn't required, but it keeps things neat and tidy). If the vehicle has any sub folders inside the lighting equipment folders (as shown, there is a misc_g folder inside the talon helper folder), drag them out and delete the original folder. At this point, rename any folders that are named the same (in this case I've changed "helper" to edge). Place the lighting equipment folders (edge and misc_g) inside the vehicle model hierarchy folder. Because the lights are mounted on the roof and dash of this vehicle, they're fine to sit under the chassis_L2 file, however this is dependent on the lighting position (ex: if you have lights in the grill, they should go inside the "bonnet" folder. NOTE: Always make sure the extra_L0 files are above the lighting equipment model, such as the base/stand, itself!). Hopefully this tutorial helped you. If you have any questions, please leave them below and I will try my best to answer them. :)
-
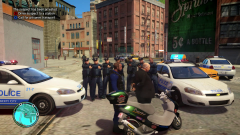
![LCPD & LPET [REL]](//s3-gallery.int-cdn.lcpdfrusercontent.com/gallery/album_2742/sml_gallery_148413_2742_39341.jpg) Lovely design on the Crown Vic, poor font choice though.
Lovely design on the Crown Vic, poor font choice though. -
You wouldn't get anywhere, the AI would crash into everything in it's path. Neat idea though.
-
Go ahead and thank KevinDV for that (and the entire car for that matter). All I did was throw some equipment on it, lol.
-
This is the 2013 model, not the 2011. The bumper looks pretty accurate to me: I know it's not accurate, but I prefer the mirrors like this, it matches my livery.
-
From the album: Illusions
-
 I see, lol. Gotta love those RC20's! It's probably your .wtd file, I almost always have issues with the textures.
 -
Ah okay, got any other pictures of the bumper/front of the car? It looks off compared to the one I have on my Caprice.
-
 I think you need to up the volume some more, even the louder version sounds a bit too quiet compared to GTA IV's original sounds. I'd try to touch up the looping on the wail too. Not bad for a first though!
- 16 comments
- 2 reviews

![[WIP] Pinellas County Sheriff Tahoe](http://s3-gallery.int-cdn.lcpdfrusercontent.com/gallery/album_2838/sml_gallery_120090_2838_159062.png)


![LCPD & LPET [REL]](http://s3-gallery.int-cdn.lcpdfrusercontent.com/gallery/album_2742/sml_gallery_148413_2742_39341.jpg)

