
IceGuy221
Members
-
Joined
-
Last visited
Everything posted by IceGuy221
-
So based on this it sounds like your installing replace files. Are you sure you’re installing them in the right place? what directory are you installing them to? Do you have packfile limit adjuster, heap adjuster, resource adjuster, and any other required mods
-
Oh my goodness brother i can see that you are having some issues. I’m gonna need a couple things to be able to help you. first of all based on this image some of your callouts and plugins are somehow installed twice which can cause issues. You also have some unneeded files in there. And I’m assuming these are in the right directory only bc the directory isn’t shown in the image. but I’ll also need you log. It’s located in your main game directory where ragepluginhook.exe is located. It’s a text file names RagePluginHook or RagePluginHook.log (as shown in image below) I’m also going to need a screenshot of your main game directory just to make sure you have everything installed correctly there. I’m going to try and help you the best I can with this,

-
It looks like it says something called CarCrashMod is causing it. This is labeled under Adam69 Callouts. It’s a super long error and a series of different errors including system32 errors
-
Yes just click the add files button in here, and locate the file through the browser when it pops up
-
I need the full RagePluginHook.log file please. It’s in your main game directory, where ragepluginhook.exe is located, as shown in the image below

-
 Not even gonna lie I bout broke my neck doing a double take when I saw this thumbnail bc I thought you stole one of my screenshot for a second lmao 🤣 Confused? This is what I mean, below is my screenshot: I posted this in a couple discords and on this website so I could’ve been possible but I thought it was funny enough to share. Pack looks good tho, good work
 -
The order of whether you install addons first last or in the mix won’t have any effect on their functionality. All that matters is that they are installed correctly. I’ve never heard of add-on vehicles automatically overriding replacement vehicles on their own, however I’m not fully sure what pack you used, and I supposedly it could have come with another file that allows for this. If you don’t mind linking the pack I can take a look to better understand how this happened
-
Make sure it’s the most updated version of scripthookv, and make sure you also have the latest scripthookvdotnet (nightly) and ragenativeui install head adjuster and packfile limit adjuster. And install the latest advanced hook v for ELS (required for ELS) should solve issues. I also recommend LemonUI. If you choose to install lemonui, you will need to install the following folders from the package into your scripts folder: RPH SHVDN3 SHVDNC If that doesn’t work, try following steps:
-
Can you send your RPH log? I’ll look at it and help determine what would be causing your crash
-
Hey there, this is a common issue that can usually be fixed easily! It’s important to know which EUP version you are using though! If you are using the free 8.3/9.3 version of EUP, you need to install EUPFR or EUPFR-UE and you need 9.3 configurations. As these will tell your game what the AI from ultimate backup what to wear. If you are using the patreon version of EUP (9.10) the. You need to install EUP Ultimate Backup Configurations (9.10). I’ll link the below and you can click on the link(s) that you need. For Free Version (9.3) - 9.3 Configurations - EUPFR-UE - EUPFR For Patreon Version (9.10) - UB Configurations
-
Hi there! Can you send your ragepluginhook log file? It can be found in your main game directory where ragepluginhook.exe is located (not the logs folder) The issue you’re running into is something that can happen when playing LSPDFR, but usually isn’t repeated consistently. It can also be caused by a number of things. I’ll take a look at the log and see if I can find any issues there first!

-
Do you have gameconfig? As well as heap adjuster and packfile limit adjuster
-
Hello, there don’t appear to be any crashes or errors in your log that I can find. At what point does the game crash? Is it consistent? When did this crash start occurring?
-
Can you post you RPH Log plz! Also were the vehicles you deleted addon or replace? If addon, did you remove the item line from your dlclist.xml?

-
Gameconfig is generally preference, here’s the link to the one that I use with my game, as well as another one that I found with a quick google search: what I use: https://www.gta5-mods.com/misc/how-to-install-gameconfig-in-gta-5-version-1-0-350-1-1-36-gta-5-gameconfig-for-limitless-vehicles google search: https://www.gta5-mods.com/misc/gta-5-gameconfig-300-cars
-
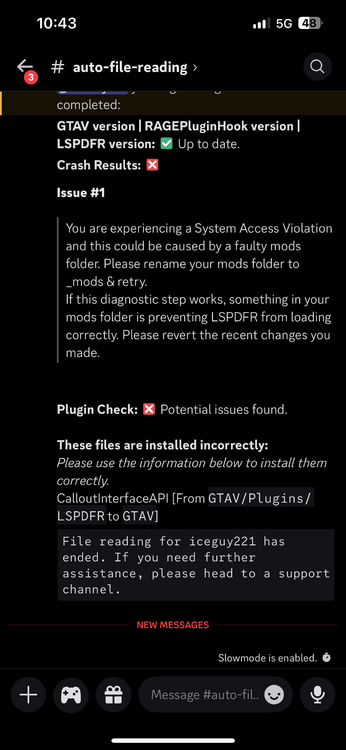
it looks like calloutinterfaceapi is installed in the wrong place. It’s currently in GTA V/plugins/lspdfr This file needs to be in your main directory (where gta5.exe is located) if this fixes the issue then we found it, if not rename your mods folder to _mods and see if it works. If it does, something in your mods folder is causing the crash, and needs to be reverted. This could also be from an install issue
-
There are plenty of videos out there. Just make sure you install it to a clean copy of GTA, and not the directory where LSPDFR or any other mods would be located. You can create a copy of you game by backing up game files. YouTube References: - - - these are just some references, there are plenty of tutorials on YouTube, and there should be one that helps you to your needs
-
It could be an installation issue if that didn’t fix it, or something simple that’s just hiding out. While I doubt I’ll find anything in the log about it, try sending your RPH log and I’ll skim through it. Also make sure everything is installed through the proper directories if possible. Do you have Heap Adjuster and/resource adjuster installed? If so you can try increasing your heap adjuster slightly to see if that fixes anything
-
Try sending the new log and hopefully I can find something in there now that all the other issues are cleaned up a bit. I know how frustrating it can be to have to do full reinstalls
-
You must install FiveM and LSPDFR to seperate game directories, they cannot both be run on the same GTA directory.
-
Please post the ragepluginhook log, located in the main directory (NOT THE LOGS FOLDER)

-
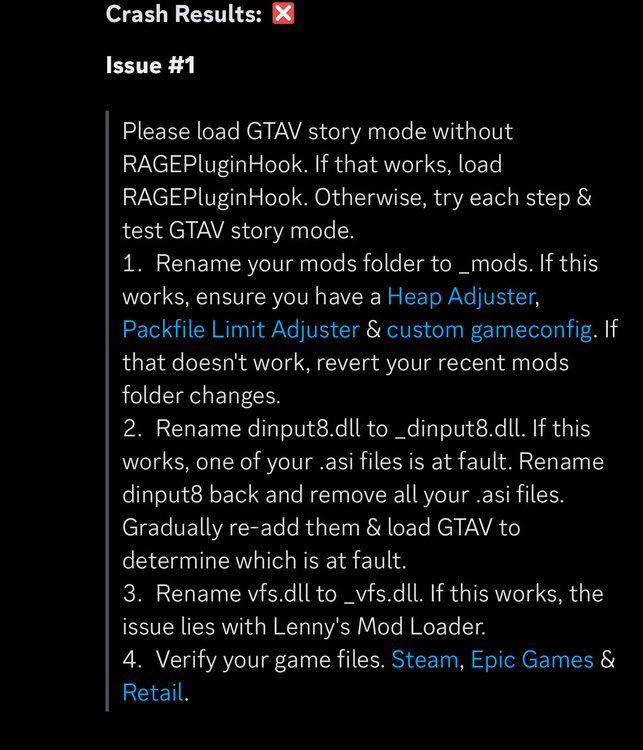
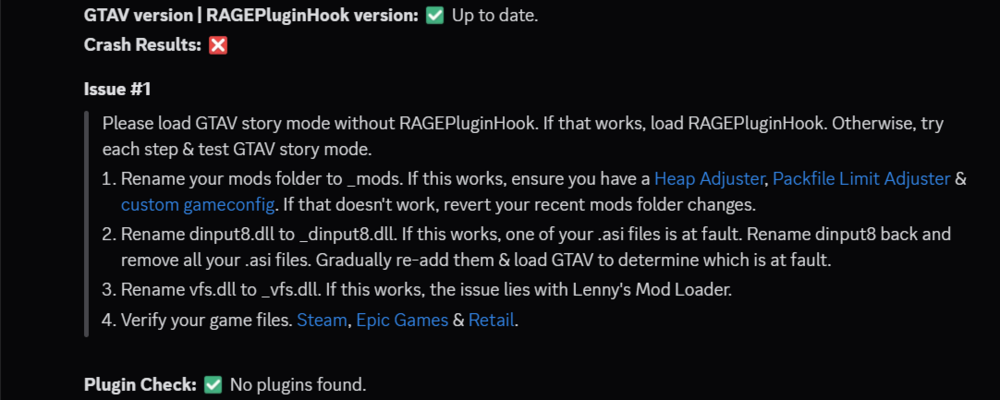
then the issue is likely outside of the mods folder. Try renaming dinput8.dll to _dinput8.dll If this works, one of your .asi files is at fault. rename dinput8 back and remove all your .asi files. Gradually re-add them & load GTAV to determine which is at fault. If that doesn't work rename vfs.dll to _vfs.dll. If this works, the issue lies with Lenny's Mod Loader. If that doesn't work, try Verifying your game files.
-
I would try the steps above if you haven't already. Also make sure that ScriptHookV, ScriptHookVDotNet, and RageNativeUI are up-to-date! (ScriptHookVDotNet Last Updated 6 days ago! This not being updated can indeed cause this type of crash) If this doesn't work let me know!
-
Hello, this isn;t the log we need to help you unfortunately. The log we need is in your main directory, not the logs folder. It will be a text file named RagePluginHook or RagePluginHook.log

-
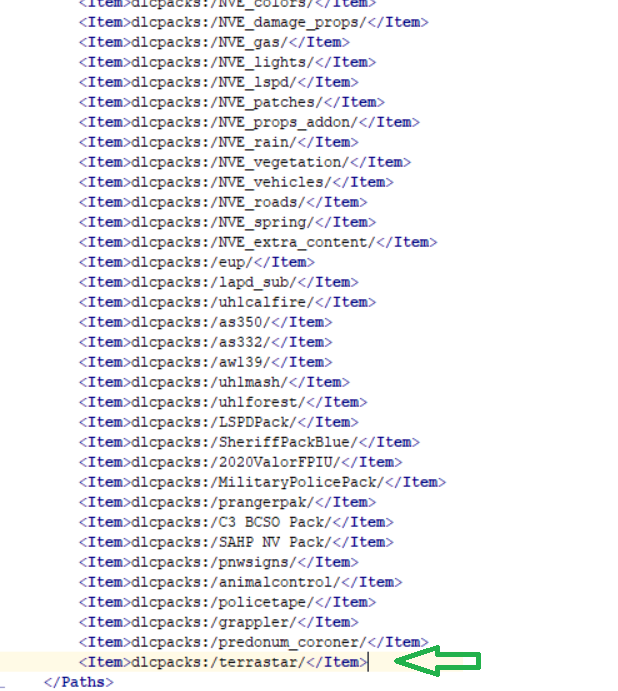
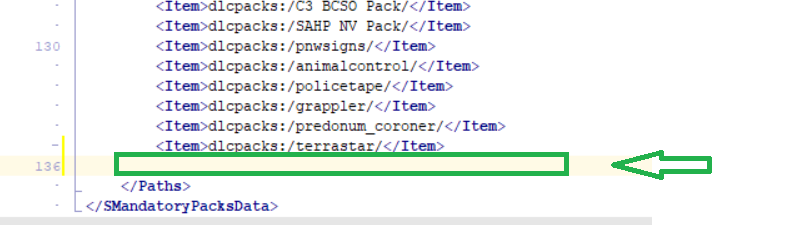
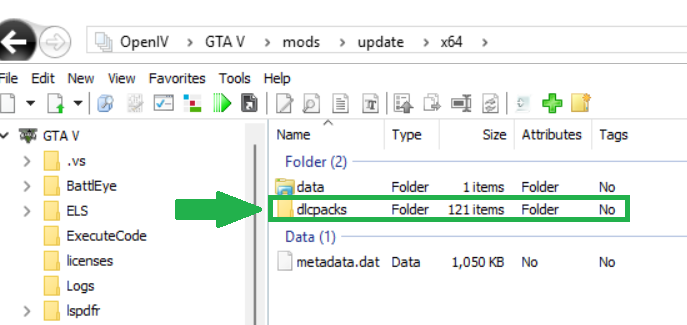
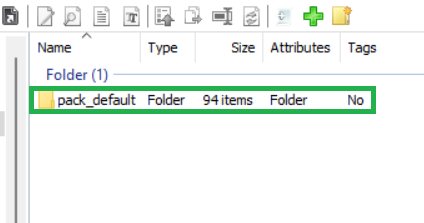
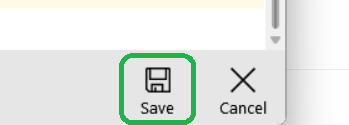
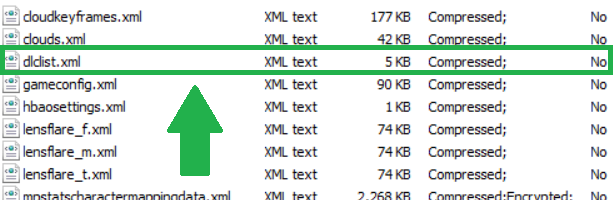
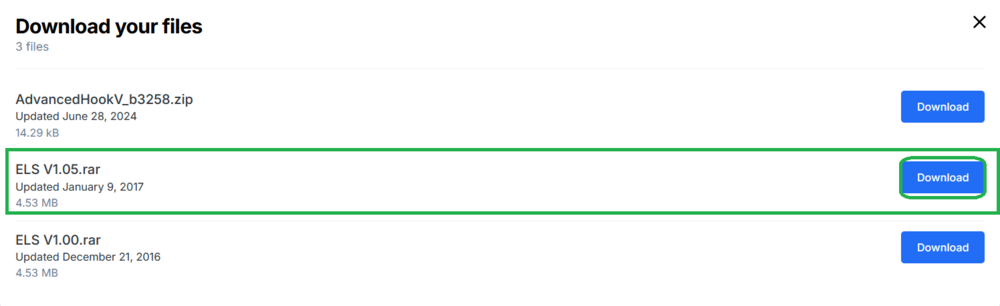
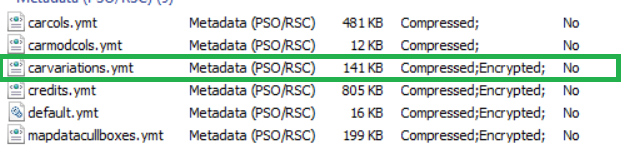
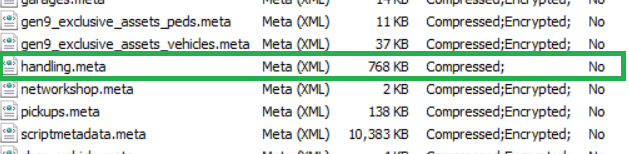
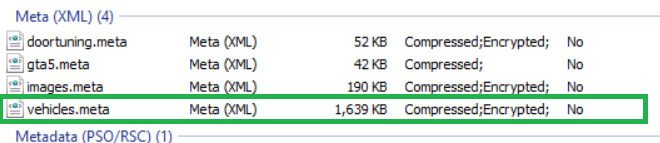
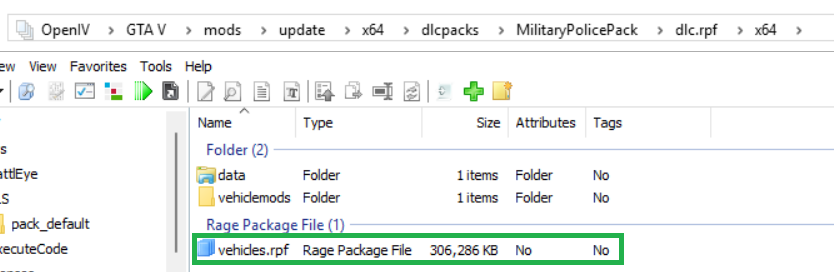
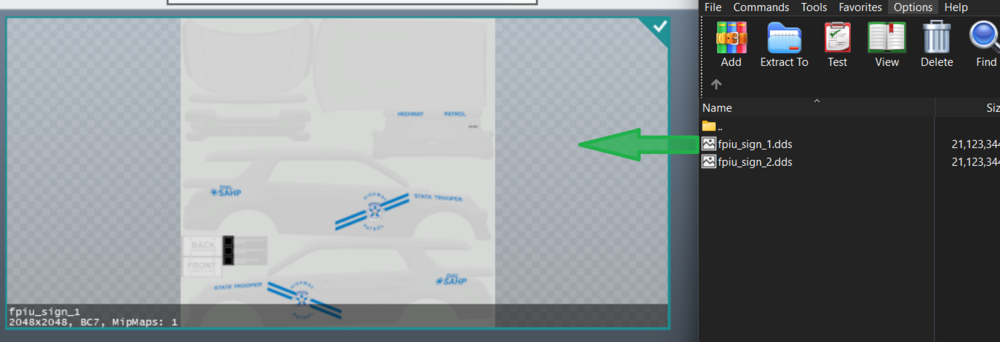
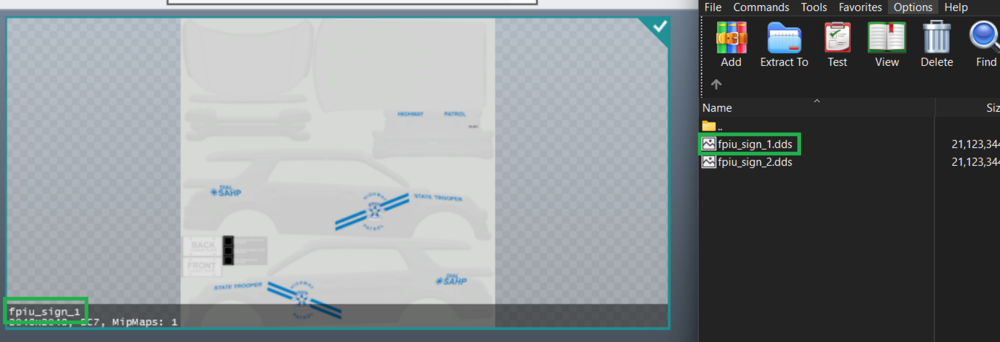
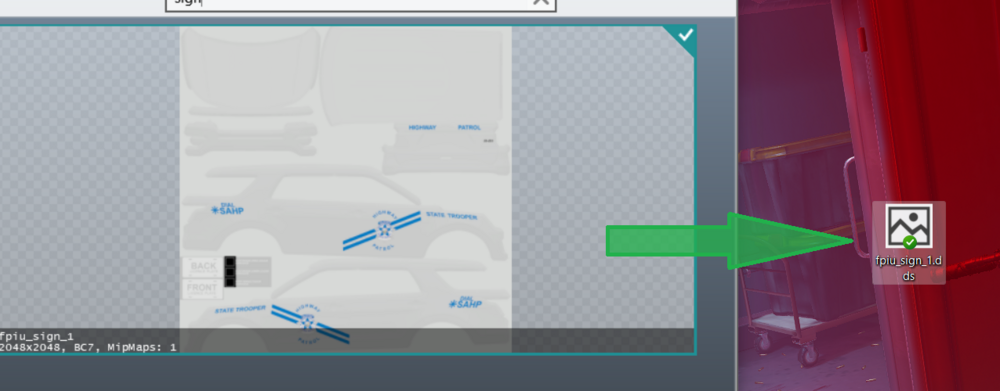
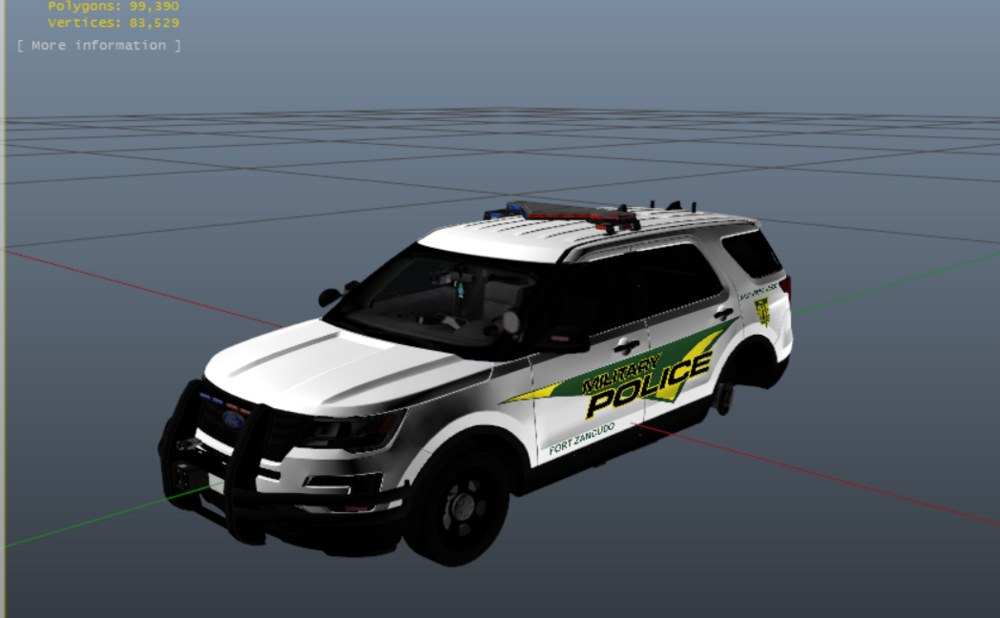
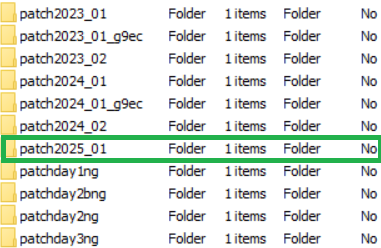
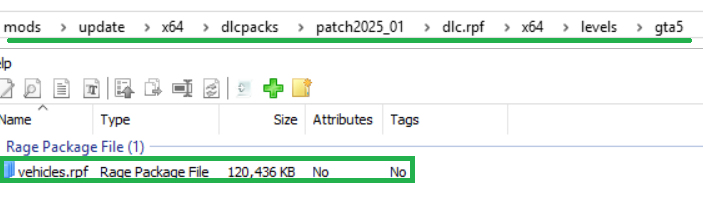
So while I know there are plenty of tutorials out there, I've been seeing a lot of support requests that regard the installation of vehicle files. My goal is for this post to serve as an "up-to-date" guide to help those in need. This guide covers how to install vehicles (ELS & Non-ELS), Liveries, Installing ELS, & More! Please note that this guide does not cover installing DLS files or editing PR Files Updated As Of: 7/27/25 Installing Add-on Vehicles: Finally found a vehicle add-on pack that you want in your game? Here's how you can install it! For add-on packs, the installation is quick and simple. First in your OpenIV, go to the following path: GTA V/mods/update/x64/dlcpacks From here, you can drag and drop the folder containing the dlc.rpf file here. This folder contains all the files for your vehicle. Now that you dlcpack is installed, we need to tell the game to use it. Go to the path: GTA V/mods/update/update.rpf/common/data In this pathway, you should be able to find your dlclist.xml. Right click this file, and click "Edit". Now scroll to the bottom of this document, and put your cursor at the very end of the last item listed. Press enter to create space for a new line. Now you need to enter the information for this new line in a very specific way. Type the following into your new line in the dlclist.xml: <Item>dlcpacks:/YourDLCPack/</Item> (BE SURE TO CLICK SAVE) BE SURE YOU REPLACE THE "YourDLCPack" WITH THE NAME OF THE FOLDER YOU INSTALLED INTO "dlcpacks"! THE NAME SHOULD BE TYPE EXACTLY THE SAME! (To include spaces and/or underscores) Now if this vehicle is Non-ELS, you're done! However, if you have ELS files for the vehicle, you need to install your VCF files. These can be located in the folder that in most cases is either names "VCF" or "ELS" in the Vehicle Package that you downloaded. Open that folder. Inside, should be a number of .xmls (the number varies by how many vehicles are in the pack). Now in OpenIV, go to: GTA V/ELS/pack_default Inside this directory, you will drag and drop all of your .xml files. Once they have generated in the directory, you're done! Your Add-on Vehicle Pack Is Installed! Installing Replace Vehicles: Installing replace vehicles can be challenging for some. But it's actually pretty simple! To Install your vehicle files (for emergency vehicles), go to: GTA V/mods/update/x64/dlcpacks/patch2025_01/dlc.rpf/x64/levels/gta5/vehicles.rpf Now that we've enter the directory, your .ytd & .yft files for your emergency vehicles can be placed into this .rpf directory. For civilian vehicle replacements (non-emergency vehicles), the installation is relatively similar. The only difference is which dlcpack folder you are placing the files into. This varies based on what car is being replaced, but in general it should be listed somewhere in the "READ ME" of the pack you downloaded. If all it says is latest patchday, you can either put it in patchday2024_02, or patchday28ng. This should work in most cases. If your vehicle is Non-ELS, and don't require and .meta changes, then you're done! If your vehicle is ELS, you need to install the .xml's in: GTA V/ELS/pack_default Installing Replace Files With NaturalVisionEvolved (NVE): If you have NVE installed to your game, it's important to note that NVE has its' own vehicle.rpf that basically overrides the other vehicle.rpfs with dlcpacks (for the most part). Because of this, if you're looking to install any replace files with NVE (Emergency or Non-Emergency), you need to install it to the following pathway: GTA/mods/update/x64/dlcpacks/NVE_vehicles/dlc.rpf/x64/vehicles.rpf If your vehicles are Non-ELS, and don't require any .meta changes, then your done! If you're vehicle is ELS, then you need to install the .xml's in: GTA V/ELS/pack_default Installing .meta's For Replacement Packs: If your replace vehicle requires any .meta changes/fixes, you should be very careful when installing these. I recommend ensuring that the .meta that comes with your pack contains all base information. Sometimes developers who create these meta's only include the information pertaining to the vehicle being replaced inside of a .meta file with the intention of you copying the information inside, and pasting it into the base .meta. Because of this it's important that you already (to some degree) know what you're doing. Some replace packs will contain what you need to copy and paste within the "READ ME" file. If your .meta's are solid full fixes, and are not design for you to copy & paste the information in any specific way, cool! then the install is easy, just install to the path pertaining to your .meta (listed below) Handling.meta: GTA V/mods/update/update.rpf/common/data Vehicles.meta: GTA V/mods/update/update.rpf/common/data/levels Carvariations.ymt: GTA V/mods/update/update.rpf/x64 Extratitleupdatedata.meta: GTA V/mods/update/update.rpf/common/data Always check your package installation's "READ ME" instructions for pathways (especially if your .meta is not listed here)! Vehicles.meta Handling.meta carvariations.ymtextratitleupdatedata.meta If your .meta requires copy & pasting information, you need to right click the .meta file in the OpenIV directory, and click "Edit". Inside, you need to go to the search tab, and search up the vehicle you are replacing (i.e. police, police3, policeb, sheriff, etc.) and highlight all the information pertaining to that vehicle, and replace that information with the information in the replace download's .meta information. You Should Never Edit The .meta Files Unless You Know What You Are Doing! Especially If You Are Manually Editing! Installing ELS: Need help installing ELS? No Problem, I'll cover that too! Installing ELS is very simple. First you need to go to the Emergency Lighting System Download Page [Link]. Now, download the V1.05 Version of ELS. You will also need to download the AdvancedHookV file that come inside of the 1.05 download. DO NOT Download the separate package named AdvancedHookV_b3258, as this version no longer works with the recent update. Now you need to install the ELS V1.05 package. Open the package in WinRAR. Now, in OpenIV, go to your main game directory (where GTAV.exe is located). In your WinRAR, you should see the advancedhookv file. Drop this into you main game directory. Now, open the "INSTALLATION FILES" folder. Now Open the "Grand Theft Auto V" folder. You Can drag & drop all of the files in here into your main game directory. You have now successfully installed ELS! Great Job! Installing Liveries To Your Vehicles: Looking to get a better look for a vehicle you installed? Found the perfect livery pack, but not sure how to install it? This portion of my guide will assist you with that! It's really very simple. It's important to note that every livery is design for a specific vehicle from a specific pack. There are multiple builds of different cars that the vehicle pack developers will use, and some are even made from scratch. So you can't just throw any livery on any car. Of course you can always experiment on your own my applying the livery to the car and seeing how it looks, and if it looks bad or doesn't fit, you can just reapply the original livery. For my tutorial, I will provide images from one of my own vehicle add-on packs. For the first step, locate your vehicles.rpf file: Now, locate the vehicle that you are trying to edit the livery on. In my case, it will be the fz16fpiu. Locate the .ytd for the vehicle (in some case there may also be an _hi.ytd or +hi.ytd version as well, you will need to install the livery there too!). Right click the .ytd file, and click "Edit" you should now see all of the files/images that make-up the cars design. go to the toolbar and click on the search icon (little magnifying glass) Now, in the search bar, type sign. This will bring up any current liveries that the vehicle has. Before installing the liveries, I HIGHLY recommend saving the current livery to desktop by dragging and dropping it to your desktop from the ytd. Now we can install the livery. Go to your WinRAR where your liveries that you are trying to install are located. First, we need to make sure that we have the livery named correctly. It should match the name of the livery that is already in the ytd. Now, drag and drop the livery to your ytd file. NOTE: (It doesn't matter if the file type is .dds or .png, as this just describes the file type) If you want to view the livery before installing, you can simply rename the file from .dds to .png | This will work in most cases Changing from .dds to .png.mp4 Your File should have successfully uploaded. And you should be able to view your finished product Now you can see how it fits the vehicle by opening the .yft file If it fits the vehicle properly on all sides, congratulations, you're done! If it doesn't fit right, then the livery doesn't work for that particular vehicle. You can install the original livery by dragging the original livery from the desktop to the .ytd file again. This Concludes This Guide! I Hope That This Helped You Out! Something missing or not covered? Let me know and I'll try and add it to this guide, or will create another one!


.png.219abe8ef63bea87393836b925de5e79.png)


.png.219abe8ef63bea87393836b925de5e79.png)