BlackNoise
Members
-
Joined
-
Last visited
Everything posted by BlackNoise
-
 Thanks! I was kind of in a rush yesterday because I had to go to work early this morning. Now it seems that they don't really need me today, so I'll optimize the skins today :) Hey! Thanks for your comment! I'll look into it, thanks for the tip!
 -
Here you go :)
-
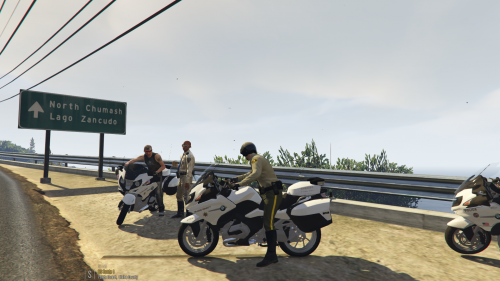
Hello guys, So yesterday I was browsing the LCPDFR site and I found someone that requested an LSSD and BCSO skin for @Thehurk's police bike. After a bit of thinking and browsing LCPDFR, I found out that there indeed was no skin for. So that is why I am happily presenting to you: The Los Santos Sheriff's Department (LSSD) and the Blaine County Sheriff's Office (BCSO) skins for the BMW R1200RT.
-
Understood. The only thing that I can actually think of myself is the vehicles.meta and the files. I'm sorry, I don't think I can help you. I hope you find a solution quickly!
-
I could absolutely take a peek at them. It'll take about one/two hours for me to get a little draft up. You'll hear from me ;-)
-
That's truely odd. Does the RAGE log give you any more specific details?
-
That's true. Hmm. That's really odd. Are you certain that neither of the other folders contains a modded police.ytd file? You can easily check where all the police.ytd files are located by pressing ctrl+F3 in OpenIV. Just search for 'Police.ytd' and check every single on of these files.
-
I have not come across these skins indeed. If you are interested, I could make them if you please. Just tell me what kind of department you would like them based on.
-
I take it, that if you say 'Take the vehicle files for the modded car out' you replace the modded files with the orignal? Not that you completely delete the police.ytd, police.yft etc.
-
Did you by chance accidentally install the mod in the non-mod folder? So that'll be {yourgtavdirectory}/x64e.rpf/levels/gta5/vehicles.rpf ? If that is the case, you have to either place a backup of the x64e.rpf in your main directory or download the game again. Edit: You can, of course, see this. If you just open the x64e.rpf with OpenIV, and locate the police.ytd (or whichever car), and see if it is the original car from the game.
-
That's right, me neither. Seems like the website is still under attack...
-
Haha, thanks mate. I posted it on the tutorials forum too, because I was halfway writing this tutorial and thought that more people could use it :P
-
Haha, whoops, I think I misunderstood your question. I have absolutely no idea how to use zmodler, sorry haha
-
I don't know IF this helps, but I had the same issue with my FBI2 slot. Replaced the vehicles.meta file with the original one from GTA V, and fixed the problem...
-
So I was browsing the help section, and I saw that there were a LOT of people not knowing how to make a skin for a vehicle. Feel free to use this as a guide and feel free to refer to this topic to show people how to make one. What you need: - GIMP (Free to use image edit software. Basically paint for adults :-P) - OpenIV to mod GTA V vehicles - A valid copy of GTA V. I will not help you if you have illegally obtained the game. (Dang I sound like your avarage plugin creator) - A little knowledge on how to add cars via OpenIV - An idea - A template of a car. Without it I wish you the best of luck. Step 1 - Obtaining your template Most car mods include the template of that very car. Open it with Gimp. Now the next optional step depends on your own needs/preference. Note that every car is different, so if you want to make (just an example) a template for Pete's CVPI, chances are that that skin won't work on Henry's CVPI. Step 2 - Resolution. This isn't Minecraft, so ditch the low res (optional) You can choose to make a 4K model. If you want to do that, just stretch the image in Gimp, giving it a 4096x4096 resolution. 2K is also possible, just give it the 2048x2048 resolution. The reason to choose for this is that it just appears more detailed. The higher the resolution, the more detailed (important for small details like decals or logo's) skin. The downside to this is that (I speak from experience) your saved Gimp file (not the exported image file but the saved templates) can go over 1GB per skin. So personally I'd go with the 2K or just the regular resolution the template comes in, to practice/start with. Step 3 - Layers? Layers. Once you've opened your template and (optionally) changed the resolution, you're able to start the texture! Please note that this step is VERY important if you want to be able to edit mistakes. In my personal experience, this is the most made mistake in the skin making business. So you've got your texture file in Gimp, but there is this one step you need to take before you can start. You'll notice that (if you didn't close it :-P) there is a 'Layers' window. (If you've accidentally closed it, no worries, click Windows->Dockable Dialogs->Layers, or simply press ctrl+L). Here you'll see your template image. Create a new Layer by right clicking in the layers window and clicking 'New Layer'. This has to be the same resolution as your template image. In the 'Layer Fill Type', select White. Now the reason that you just created a new Layer, is that you want to make a new skin, and not edit the template. If you edit the template, every stripe and color in the template will appear on the vehicle in game. You don't want that. You want the stripes/colors/logos/whatever the heck you want on your vehicle. That's why we just created a blank overlapping layer, on which we'll edit the skin. Step 4 - Making the layer editable No worries now, I know that your whole Gimp screen is white. That's because the opacity of the layer is 100. We'll change that to around 30%. You can also make this 10%, 0% or whatever you find easy to use. The important part is that you can see what you are editing. Okay, let's imagine a scenario here. You want to make a difference and think that a pink police car is awesome. No offense, if it gets you happy I'll download it and use it for a day, but that aside, you want a pink car, period. That's alright, but you have just made a white layer. Step 4.1 - Creating the template color Really, we can give this job to the kids in kindergarten, this is the easiest step of the whole guide. In the toolbox - the other window that is open - you'll choose the little bucket. (You closed that too? Silly. Go to Windows->Dockable Dialogs again and select the 'Toolbox'). Next, click on the two colors just a little below that bucket, and select the color you want. Pink in our situation. (Don't complain, you wanted a pink car.) Make sure that your newly created layer is selected (Which is again VERY important, you don't want to temper with the template file, as it won't be visible in our car), and just bucket fill the whole thing in your preferred color. Step 4.2 - A little insider's tip What I always do, is create a new layer for every single part I edit. I.e. a layer for the right side of the car, a layer for the top, a special unit number layer. This comes in useful when you want to change a little thing. Also, it makes it easier to find things that you're looking for. Editing is all about structure and logic. Step 5 - It's time... Oh yes. Here we go. We're making our skin. Choose a point that you want to start with, let's say the right side of the car. If you've got a very creative mind and a good idea, you can, of course, do it from your head, but most of the people that make a skin use a picture of a real police car to base their skin on. So let's look at our picture or look deep into our minds on what it is that we actually want. Good luck making the skin! Step 5.1 - Folders to organize all of our work Let's suppose that you want to make a vehicle that has a number written on it. Of course, you can create text with Gimp, just click the little 'A' in the toolbox. But another small tip that I've got for you is naming it. Just edit the name of the layer in your layers window. Also, you can create folders in your Layers window. This is especially nice to put all the text in. Right click in the layers window, and click 'New Layer Group'. Here you can put all your text in, which if you're making a detailed skin, floods your Layers window. Step 6 - You done yet? This is taking forever man, speed it up a little. I'm joking, of course. A nice skin often takes hours sometimes days to make. But for a start (or if you are a talent) 30 minutes will do. If you actually are done, let's finish this thing! Step 6.1 - Let's save things Saving is important, let's be completely honest here. How many times you had a project that you worked all night on and it was gone because your laptop ran out of power? Or your PC decided to stall on you? No? Never? Me neither, I guess I watch too many series. But; back to work. We're saving, mate. I think you might be familiar, but if you're not, press ctrl+s to save. (I know, revolutionary, right?) Saving the Gimp file in its own extension will make sure that you can edit everything that has to do with layers. If you just export the file to an image file, the layers are gone. So I'd say, save it as a Gimp file AND export it when you're done. Step 6.2 - Preparing the export First of all, you are going to want to make sure that your template is not visible. You can either do this by clicking the template layer and setting the opacity to 0% or making sure it's under all the other layers. If you did this, make sure all the layers that you want to be visible on the car, are at 100% opacity. You did this? Awesome! Let's export this thing! Step 6.3 - Ready for testing! Exporting. You've GOT TO export the file to make sure it's usable on a car in the game. Click 'File->Export As' and make sure you save it as a PNG FILE. Jpeg's won't work. save it somewhere that you can find it back, not in the deepest roots of your documents. Step 7 - Installing the skin on your car Open your RPF file that your car is installed on. If you don't know what I mean by RPF, or don't know how to use OpenIV, look up a tutorial on google on how to install car mods in GTA V. Go to the car ytd file. We're taking the Police slot as an example. So we're going to the police.ytd file. Open it, and find the image named {this varies)_sign_{sometimes a number}. Click 'replace' in the top of the window, and choose your skin. Click save, and press Ctrl+Shift+R (Or find the defragment option somewhere in OpenIV). Defragment it, and launch GTA V Step 8 - Lemme see it! Alright. We're in GTA V now, welcome. Spawn the car that you installed your skin on. (So we're spawning the Police car), and enjoy your livery! If you see another skin on the car or no skin at all, go to your trainer and find the Car Livery Menu. You can cycle between different skins there. Now, if you have any questions regarding this tutorial, feel free to send me a message or post a comment below. If you have any tips for me or a tip regarding this tutorial, let me know too! I hope I helped you guys out a bit, Enjoy 2017 Daniel
-
The easiest and legally free method is rather simple: You'll need to download an image editor such as Gimp (which I recommend, it is a free application that is pretty resourceful if you ask me...). Once downloaded, you can start with new templates for models. Step 1 - Obtaining your template Most car mods include the template of that very car. Open it with Gimp. Now the next optional step depends on your own needs/preference. Note that every car is different, so if you want to make (just an example) a template for Pete's CVPI, chances are that that skin won't work on Henry's CVPI. Step 2 - Resolution. This isn't Minecraft, so ditch the low res (optional) You can choose to make a 4K model. If you want to do that, just stretch the image in Gimp, giving it a 4096x4096 resolution. 2K is also possible, just give it the 2048x2048 resolution. The reason to choose for this is that it just appears more detailed. The higher the resolution, the more detailed (important for small details like decals or logo's) skin. The downside to this is that (I speak from experience) your saved Gimp file (not the exported image file but the saved templates) can go over 1GB per skin. So personally I'd go with the 2K or just the regular resolution the template comes in, to practice/start with. Step 3 - Layers? Layers. Once you've opened your template and (optionally) changed the resolution, you're able to start the texture! Please note that this step is VERY important if you want to be able to edit mistakes. In my personal experience, this is the most made mistake in the skin making business. So you've got your texture file in Gimp, but there is this one step you need to take before you can start. You'll notice that (if you didn't close it :-P) there is a 'Layers' window. (If you've accidentally closed it, no worries, click Windows->Dockable Dialogs->Layers, or simply press ctrl+L). Here you'll see your template image. Create a new Layer by right clicking in the layers window and clicking 'New Layer'. This has to be the same resolution as your template image. In the 'Layer Fill Type', select White. Now the reason that you just created a new Layer, is that you want to make a new skin, and not edit the template. If you edit the template, every stripe and color in the template will appear on the vehicle in game. You don't want that. You want the stripes/colors/logos/whatever the heck you want on your vehicle. That's why we just created a blank overlapping layer, on which we'll edit the skin. Step 4 - Making the layer editable No worries now, I know that your whole Gimp screen is white. That's because the opacity of the layer is 100. We'll change that to around 30%. You can also make this 10%, 0% or whatever you find easy to use. The important part is that you can see what you are editing. Okay, let's imagine a scenario here. You want to make a difference and think that a pink police car is awesome. No offense, if it gets you happy I'll download it and use it for a day, but that aside, you want a pink car, period. That's alright, but you have just made a white layer. Step 4.1 - Creating the template color Really, we can give this job to the kids in kindergarten, this is the easiest step of the whole guide. In the toolbox - the other window that is open - you'll choose the little bucket. (You closed that too? Silly. Go to Windows->Dockable Dialogs again and select the 'Toolbox'). Next, click on the two colors just a little below that bucket, and select the color you want. Pink in our situation. (Don't complain, you wanted a pink car.) Make sure that your newly created layer is selected (Which is again VERY important, you don't want to temper with the template file, as it won't be visible in our car), and just bucket fill the whole thing in your preferred color. Step 4.2 - A little insider's tip What I always do, is create a new layer for every single part I edit. I.e. a layer for the right side of the car, a layer for the top, a special unit number layer. This comes in useful when you want to change a little thing. Also, it makes it easier to find things that you're looking for. Editing is all about structure and logic. Step 5 - It's time... Oh yes. Here we go. We're making our skin. Choose a point that you want to start with, let's say the right side of the car. If you've got a very creative mind and a good idea, you can, of course, do it from your head, but most of the people that make a skin use a picture of a real police car to base their skin on. So let's look at our picture or look deep into our minds on what it is that we actually want. Good luck making the skin! Step 5.1 - Folders to organize all of our work Let's suppose that you want to make a vehicle that has a number written on it. Of course, you can create text with Gimp, just click the little 'A' in the toolbox. But another small tip that I've got for you is naming it. Just edit the name of the layer in your layers window. Also, you can create folders in your Layers window. This is especially nice to put all the text in. Right click in the layers window, and click 'New Layer Group'. Here you can put all your text in, which if you're making a detailed skin, floods your Layers window. Step 6 - You done yet? This is taking forever man, speed it up a little. I'm joking, of course. A nice skin often takes hours sometimes days to make. But for a start (or if you are a talent) 30 minutes will do. If you actually are done, let's finish this thing! Step 6.1 - Let's save things Saving is important, let's be completely honest here. How many times you had a project that you worked all night on and it was gone because your laptop ran out of power? Or your PC decided to stall on you? No? Never? Me neither, I guess I watch too many series. But; back to work. We're saving, mate. I think you might be familiar, but if you're not, press ctrl+s to save. (I know, revolutionary, right?) Saving the Gimp file in its own extension will make sure that you can edit everything that has to do with layers. If you just export the file to an image file, the layers are gone. So I'd say, save it as a Gimp file AND export it when you're done. Step 6.2 - Preparing the export First of all, you are going to want to make sure that your template is not visible. You can either do this by clicking the template layer and setting the opacity to 0% or making sure it's under all the other layers. If you did this, make sure all the layers that you want to be visible on the car, are at 100% opacity. You did this? Awesome! Let's export this thing! Step 6.3 - Ready for testing! Exporting. You've GOT TO export the file to make sure it's usable on a car in the game. Click 'File->Export As' and make sure you save it as a PNG FILE. Jpeg's won't work. save it somewhere that you can find it back, not in the deepest roots of your documents. Step 7 - Installing the skin on your car Open your RPF file that your car is installed on. If you don't know what I mean by RPF, or don't know how to use OpenIV, look up a tutorial on google on how to install car mods in GTA V. Go to the car ytd file. We're taking the Police slot as an example. So we're going to the police.ytd file. Open it, and find the image named {this varies)_sign_{sometimes a number}. Click 'replace' in the top of the window, and choose your skin. Click save, and press Ctrl+Shift+R (Or find the defragment option somewhere in OpenIV). Defragment it, and launch GTA V Step 8 - Lemme see it! Allright. We're in GTA V now, welcome. Spawn the car that you installed your skin on. (So we're spawning the Police car), and enjoy your livery! If you see another skin on the car, or no skin at all, go to your trainer and find the Car Livery Menu. You can cycle between different skins there. So yeah, that's basically it. You had a short question; here is your 8000+ length tutorial. If you have any questions, feel free to let me know :-) Yours sincerely, Daniel
-
Sorry, did not know that, thought I should let him know to prevent the mistake in the future :$ You can try to run the game with only RAGEhook, ScripthookV and LSPD:FR first. If that works you should re-install all the plugins one by one to see what causes the problem.
-
Hi Martinez, Do you have any plugins installed? If so, try to launch the game without any plugins preloaded. You can do this by clicking the gear when launching the RAGEhook launcher (before startup), and head to the 'plugins' section. In this section, you can select to load all plugins, load certain plugins or don't load any plugins at all. I would select the last one to see if the problem consist while only loading RAGEhook and not the third party plugins. I'd like to hear from you if you have any more problems, Daniel
-
Yes. You will need to install RAGEhook in order to get the game to work with mods. I strongly recommend installing both ScripthookV and RAGEhook before installing any mods. So summarized: Download and install RAGEhook and ScripthookV. Start the game via the RAGEhook executable file located in the main directory of your copy of GTA V. If everything works fine and you can play the game after it had loaded, proceed to install LSPD:FR and/or other modifications to the game. If there is anything you need help with, let me know, Daniel
-
First of all: Wrong section. This has to be moved to the support section of this site. Second of all: Install OpenIV. When installed, install its GTA V plugin and let it make a mods folder. This way you can revert it if something is messed up. What plugins have you installed? I'd like to hear from you, Daniel
-
Hey guys, So I recently got into modding, but I did something (no idea what) that messed my car names up. Every time I pull someone over, or want to spawn a car the Ragehook way, It gives a code. This is especially annoying with callouts like hit and run, because I get the message "The suspect was in a {stupid code instead of car name} with the license plate ....". I've got a mod folder so I also have the original, non modified files. Any suggestions what to replace or what file I messed up? Thanks in advance, Daniel
-
Hi guys, So, I've downloaded and installed GTA V. Played it yesterday with some plugins and scripts, and decided today that it was time for some awesome car mods. I thought it was easy, but hey, why make it as easy as GTA IV, right? So my problem is: I was installing car mods. It didn't work for me, so I thought 'Eh, I'll watch some video's on youtube'. After succesfully replacing one car (POLICE2), I tried to spawn the car in the POLICE slot, but every time that I try to spawn the POLICE or POLICE3 car, it says 'invalid model'. I've got a backup, so it is possible for me to just copy the files from the backup, but before I'm copying 67gb of awesome game, I'd like to know if I could fix it another way... Yes, my copy IS legal, it is activated via the Rockstar Games Social Club (so no steam). I got it to work yesterday, so it had worked before. I hope you can help! Merry Christmas, Daniel
-
Hiya, So I started playing LCPDFR again, and I got this error. I noticed it when I was playing. I was playing it all flawlessly, but then everything I tried to do what had something to do with LCPDFR (call backup, arrest, pull taser) did not work anymore. I stopped the game and looked into the error logs and this came out; I hope anyone reads 'code' and is able to help me :P -Daniel
-
Always mixing those two up, sorry. In that case, it's going to be hard...
-
Looking into this by the way, shows that it is actually not a Caprice. It is an Impala, of which are lots of models created. If you're still interested, leave a comment ;) -Daniel AKA BlackNoise