Creators: Due to background reprocessing of files, approvals and file security checks may be delayed. Thanks for your patience.

willrs
Members
-
Joined
-
Last visited
Everything posted by willrs
-
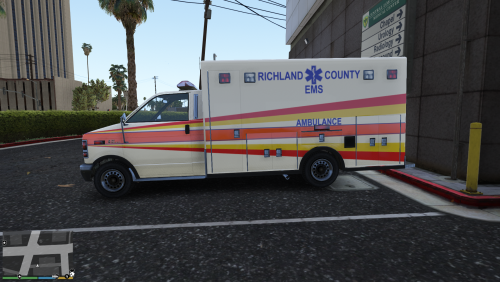 For those that want more Richland County in their game, I made this skin. It's made for the templated vanilla ambulance here: https://www.gta5-mods.com/vehicles/air-port-service-and-service-vehicles-template-pack I couldn't get all the graphics to fit on perfectly, but I think just for occasionally calling an ambulance it's more than adequate.
- 1 comment
- 1 review
-
-

- 1
-
-
 I tried making a richland county deputy the other day to replace the default cop, but I must not really know what I'm doing with peds bc when it didn't crash my game, the torso would float in the air separate from the rest of the body
- 43 comments
- 10 reviews
-
-
http://www.gta-mod-center.com/forum/index.php?/files/file/821-devv-whelen-liberty-pack/
- 43 comments
- 10 reviews
-
-
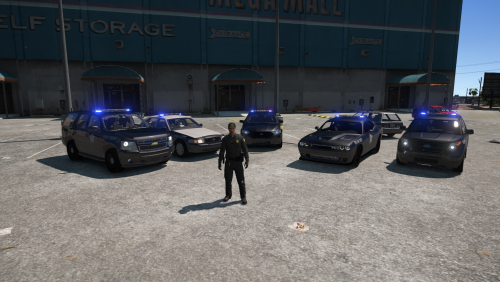
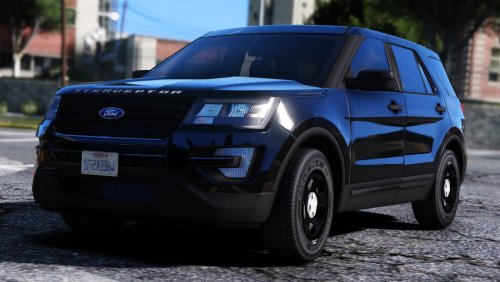
FOR THOSE THAT HAVE INSTALLED BEFORE, I RECOMMEND THAT YOU REINSTALL ALL VEHICLES AND ELS VCF'S THAT ARE IN THIS UPDATE (As seen on Live PD) this is the 2016 Ford Police Interceptor Sedan, CVPI, Ford Police Interceptor Utility, and Chevy Tahoe from Richland County, S.C. For a while I was using BradM's Richland County-based BCSO skin pack, but I found the amount of cars with just a lightbar and no pushbar lacking so I taught myself modeling and put this together. The files are named "RCSD1.___" but obviously you can rename it for whichever slot you want; I just have it that way since they are added vehicle for me. If you want more Richland County, SC in your game, check out my EMS skin:
- 43 comments
- 10 reviews
-
-
- 11
-
-
 Could you list some? Besides here I mainly look on GTA Mod Center, I don't know of any other good ones. Thanks
 -
It's been a little bit since I did this, but as I recall I just exported the .ymt to my desktop, and either replaced the ".ymt" with ".meta" and opened it; or didn't even need to change it to edit with notepad++
-
I assume the lights that aren't .z3d are .yft, and those you add to what you already have open by either file>import or file>merge
-
Do you mean where to download parts?
-
These are the main tutorials I used to get started https://www.youtube.com/watch?v=5PXagcl56M4 https://www.youtube.com/watch?v=tIajaCfnTrc&t=867s https://www.youtube.com/watch?v=iTKmKBot3ws&t=7s
-
I had a similar issue when I was putting whelen dominators in the side window of a tahoe by placing one and then duplicating and mirroring for the other side. I don't know what caused it, but I found that instead of doing the mirroring for convenience, manually placing the second light didn't result in the same problem
-
If you're using siren mastery, you can raise the volume of all the sirens in one of the .ini's
-
Finally got around to fixing this, and changing those in the gresley handling from 0.75 to 0.4 did the trick. Thanks
-
After I rotated the entire lightbar and it's dummies to be level with the roof, I went back and made the dummy as level to the horizon as I could and for some reason that made the takedowns aimed perfectly. Doesn't make sense to me since the dummy was level with the horizon before I rotated the entire lightbar. Also I figured out that rotating extra 12 dummy on the x&y axis from the side view aims the alley lights more toward the front or more towards the back of the vehicle
-
The easiest thing to do would probably be to photoshop the png that the glass is mapped to
-
I've been able to change the way my takedown lights face, but not able to get them facing forward. Do you have an idea of on what axis the dummy needs to be rotated to change the lights and how much? When I have them facing backwards, then rotate the dummy 180o the lights don't correlate to being rotated 180
-
I had this same issue. As I recall, you need to have the taillight selected in polygon mode, then change your id in the properties. Selecting it and changing the id outside of polygon mode won't do anything.
-
This is something I've noticed while using other's vehicles, but now that I'm making my own pack it's really bugging me. With the 2013-ish ford interceptor utlity, it seems to always lean into a turn rather than leaning out like it should. I've tried the baller, baller2, and gresley handling lines and none of them fix this issue. Now, I do have "realistic driving v" installed, but I tested the vanilla baller, baller2 and gresley with their handling lines and they lean out properly. Idk if there is a different handling line I need to try (those 3 are the only ones I ever see mentioned for the fpiu), but I suspect there is something in the dev model that needs to be changed. Maybe move a dummy, rotate an axis? Hopefully someone more experienced than me is familiar with similar issues.
-
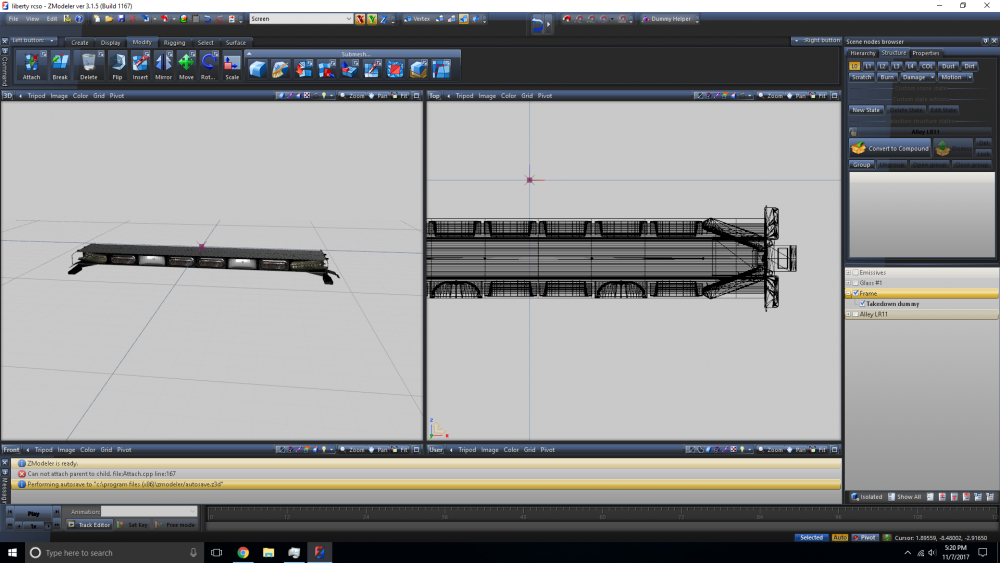
Just to make sure, I have the compounded modules inside the compounded lightbar
-
Yeah the frame is the lightbar; I'll change that for any future screenshots. I made the lightbar a compound, did the lods. When you say put the takedown into it, you're referring to making the modules a "child" of the lightbar?
-
I went ahead and did the lod'ing since I know how to do that. So made a new dummy (Takedown dummy) with the takedown modules and their copies inside of it in the hierarchy, converted the takedown dummy to compound, and did the lods. Then took that and put it in the frame in the hierarchy
-
Does this (the hierarchy) look like what you're saying?
-
Ok. Is that just a matter of hitting the "convert to compound" button with the take-downs selected WITHOUT going through lod'ing? When I was trying to lod before was the only time I used the convert to compound button.
-
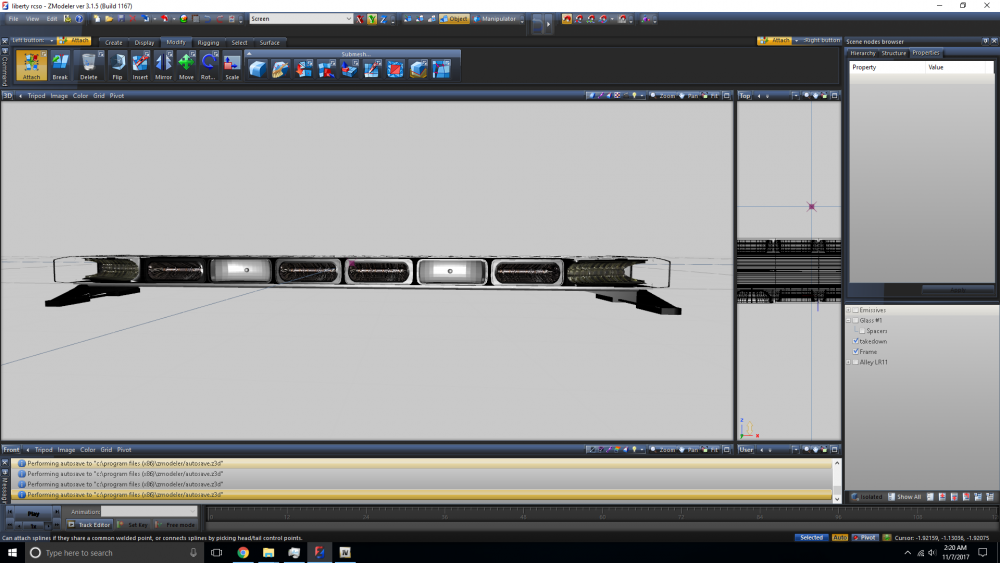
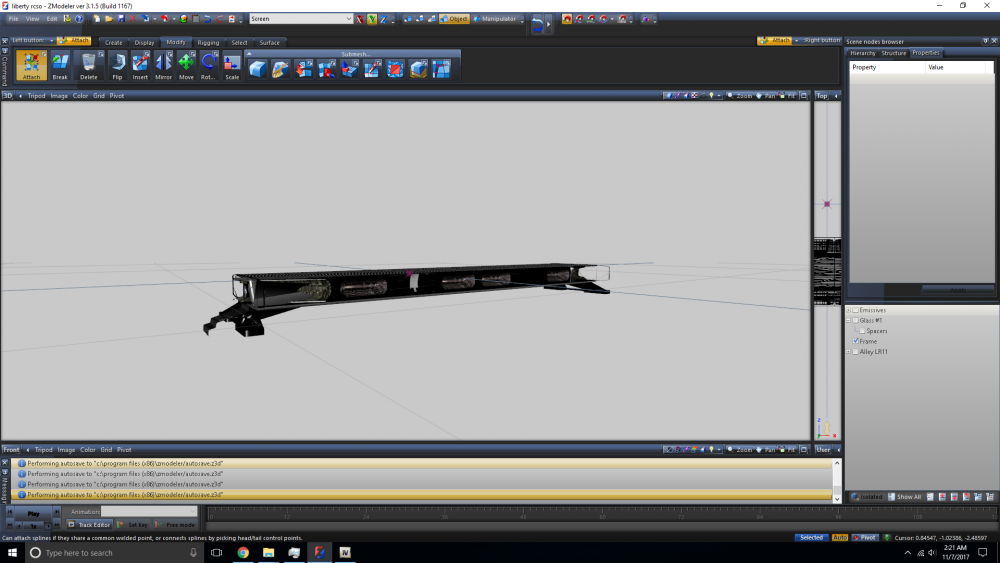
This is my first project on zmodeler, and I'm trying to set up the lightbar. The problem I'm having is I'm trying to attach the modules for the take-down lights to the frame of the lightbar (which the rest of the led modules are already attached to.) But when I try to attach the take down modules to the frame, things get all messed up, I can't really describe it but here are pictures before and after attaching You can see it's black where the take-down modules were along with the thing sticking out of the left-most module. And it's not just black frame over where the take-down modules were, they disappear from the top view as well. I've tried all kinds of things: renaming, changing position in the hierarchy; adding the other module, frame, and take-down modules in a different order. I've also attached the take-down modules to another random object and then added it to the frame only to get a similar affect, it seems anything having to do with these modules will not get added to the frame properly. I figure there is probably some property buried in a menu that is affecting the take-down modules, I just don't know Zmodeler well enough to figure it out.