


SoarHawk
Members
-
Joined
-
Last visited
Everything posted by SoarHawk
-
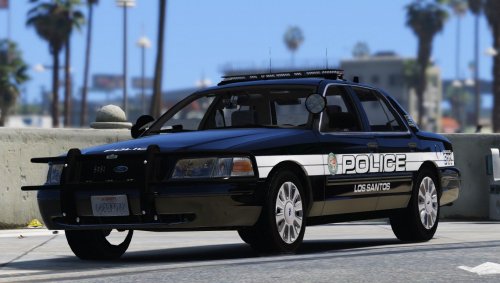 I have to say, this is one of my favorite skin packs. I absolutely love the white on black contrast. Having a fleet of black cop cars is way more satisfying in my opinion than white. The graphics on the vehicle are perfect. Not too big, not too busy, but can be seen from a distance clearly. Also love the idea that there are distinct custom unit types that you can assign to different cars. I currently have this pack on all of my Los Santos units and couldn't be happier with them. Please keep updating this file to include the new cars that are released.
- 33 comments
- 14 reviews
-
Yes, there is a way to add it. I have about 8 add on cars. Before you start this method, BACK UP EITHER YOUR MOD FOLDER OR WHATEVER YOU ARE EDITING. If the mod does not come with a vehicles.meta file, just go to Open IV, your mods folder (if you have one)> update> update.rpf>common>data>levels>gta5>vehicles.meta. Extract vehicles.meta and search for whatever vehicle the file calls to replace. For example, if the modded car wants to replace police3, find police3 in that vehicle.meta. Copy that whole section. Now, once you have that, go to a place where it can be installed. Personally, I use Update>X64>Dlcpacks>MPChristmas2>dlc.rpf>common>data>levels>gta5>vehicles.meta. Now, extract that vehicles.meta and copy and paste the lines you got for the car you're supposed to replace. However now, once you past those lines in, go to model name, txt ID, and game name and change it to whatever name you'd like. Also, make sure you copy and past this line <audioNameHash>POLICE</audioNameHash> and replace the audionamehash line or the car will not have sirens, or make noise. Delete the old vehicles.meta file in OpenIV and replace it with the one you edited. The vehicle files that you downloaded must also be changed to this name you chose in this vehicles.meta file. As for carvariations, I just use carvar's from other files because mostly they'll be the same as long as Light and Siren settings are 1. This isn't always the case, though. I've included the general format I use for carvar's for my add ons. Once you have the lines for carvar, you'll be going to a similar path, Update>X64>Dlcpacks>MPChristmas2>dlc.rpf>common>data, extracting carvariation, adding the lines of code, and replacing the original carvar. Notice, the modelname, for mine, is police6, which is the name I chose and it corresponds to the vehicle.meta file and the car files. Make sure your chosen name applies to all of these files. To install the car files, I use the path: mods\update\x64\dlcpacks\mpchristmas2\dlc.rpf\x64\levels\gta5\vehicles\xmas2vehicles.rpf\ Sample Carvariation I use: (MAKE SURE you always open a section with <Item> and close a section with </Item> or your game will crash.) <Item> <modelName>police6</modelName> <colors> <Item> <indices content="char_array"> 134 134 156 156 </indices> <liveries> <Item value="true" /> <Item value="false" /> <Item value="false" /> <Item value="false" /> <Item value="false" /> <Item value="false" /> <Item value="false" /> <Item value="false" /> </liveries> </Item> <Item> <indices content="char_array"> 134 134 156 156 </indices> <liveries> <Item value="false" /> <Item value="true" /> <Item value="false" /> <Item value="false" /> <Item value="false" /> <Item value="false" /> <Item value="false" /> <Item value="false" /> </liveries> </Item> <Item> <indices content="char_array"> 134 134 156 156 </indices> <liveries> <Item value="false" /> <Item value="false" /> <Item value="false" /> <Item value="false" /> <Item value="true" /> <Item value="false" /> <Item value="false" /> <Item value="false" /> </liveries> </Item> <Item> <indices content="char_array"> 134 134 156 156 </indices> <liveries> <Item value="false" /> <Item value="false" /> <Item value="true" /> <Item value="false" /> <Item value="false" /> <Item value="false" /> <Item value="false" /> <Item value="false" /> </liveries> </Item> <Item> <indices content="char_array"> 134 134 156 156 </indices> <liveries> <Item value="false" /> <Item value="false" /> <Item value="false" /> <Item value="true" /> <Item value="false" /> <Item value="false" /> <Item value="false" /> <Item value="false" /> </liveries> </Item> </colors> <kits> <Item>157_massacaro2_modkit</Item> </kits> <windowsWithExposedEdges /> <plateProbabilities> <Probabilities /> </plateProbabilities> <lightSettings value="1" /> <sirenSettings value="1" /> </Item>
-
Not a problem. And trust me I know. When I first started playing LSPDFR, it took me probably 20 hours just to set everything up without having glitches and things that just didn't look right. Certainly takes a lot of time, and patience.
-
I would just go back to your settings a double check Post FX and Shader primarily. Sometimes my settings get reset and I have no idea why. If that doesn't work, I really recommend trying Radiance. Prior to using Radiance, even with the settings, I really didn't like how my lights looked.
-
I doubt that would mess with your settings, but check just to make sure shader is set to high because that will certainly do it. I really do like Radiance V... much more than any other visual mod out there.
-
- Radiance V, I believe, is the best mod for making your lights show up better. -If you installed Visual V, make sure you install Radiance after Visual V, because Visual V will replace Radiance's settings. -As previous posts said, make sure your shader setting is high... but also, Post FX should be set at high or above. The above settings are how I get my lights looking bright, without Radiance along with Post FX and Shader, my lights looked dull and horrible.
-
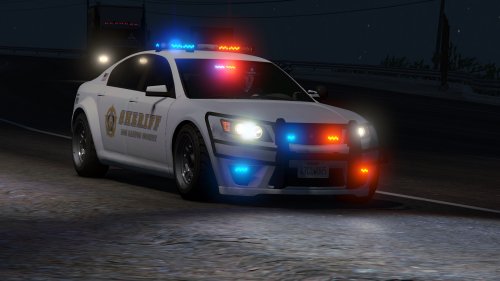
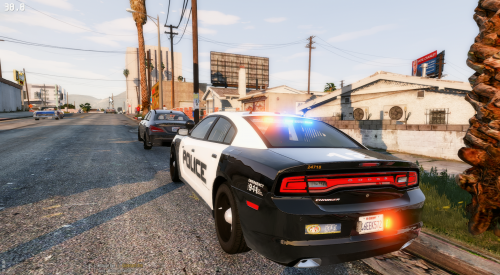 Great car. Like a previous review mentioned, I am so happy to see a car that has decent coronas and doesn't solely rely on Radiance. I believe you fixed the corona issue that I private messaged you about by removing that middle light section in the front, thank you for doing that. Maybe add this fix to your unmarked charger?? The only issues I see are that there is a tiny texture that's red and blue on the pushbar, not sure if that's supposed to be there, and also, I saw in the YTD there was a texture for a laptop, however there is no laptop in the vehicle. I know most of your vehicles have them, so I'm guessing this might be a glitch? Overall, great vehicle. One of my favorite Chargers released on LSPDFR.
- 4 comments
- 7 reviews
-
-

- 1
-
-
 Thank you! This fixed my issue, the car's bottom is now black instead of dark purple.
- 269 comments
- 67 reviews
-
I am having the same issue with this purple portion of the car. When I changed the secondary color, it did nothing. I believe it needs to be changed by Hurk and nothing really we can do about it.. unless I'm missing something.
- 269 comments
- 67 reviews
-
 Love the new update, especially that the pushbar now is black instead of grey... at least for me it is. Any chance we can see a similar updated pushbar on your Taurus?
- 38 comments
- 23 reviews
-
-
- 1
-
-
 Great great great model. Love that there are a good amount of lights, but not too much. A lot of cars here lack a good amount of lighting and in my opinion it makes the car look 100% better. Also love that this is a 2013 model, which is one of the first of it's kind on this site. Great job with the interior as well.
- 112 comments
- 36 reviews
-
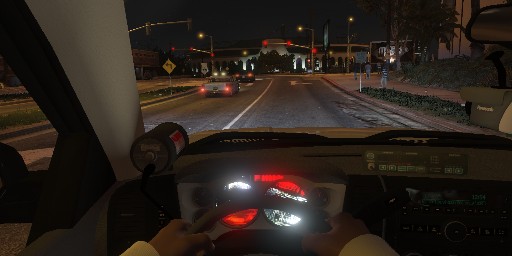
Hey guys, I have been trying to use CanadapoliceOfficial's Silverado for a few days now. Everything seems to be working okay, except the interior gauges seem to be this black, red, and white color, and I have no idea why. I added the vehicle as an add on and didn't replace any police model. I copied the sections of carvariations and vehicles.meta directly from the Canada's files. It all worked out fine except for these gauges. I reached out to Canada but the only solution provided was to try a police slot like sheriff2, which I would do, except they are all filled. Does anyone have any suggestions regarding this issue?
-
 This car was put together beautifully. It's hard to find a car that has a perfect interior, good amount of lighting, and is bug free, but you did it. Very nice job. The vehicle looks realistic enough for roleplay as well. Also love that there is an unmarked version of the car. Great vehicle, definitely recommended.
- 47 comments
- 15 reviews
-
 Downloaded the updated version of the mod tonight and all sirens were messed up. The sirens were extremely low, carried out way too much, and somewhat distorted on nearly every police vehicle. I was such a fan of this mod and it's previous version, and I'm not sure if the new version was a glitch or not, but it sounds very bad. I reverted back to the old. Hopefully you can fix this and bring back the old sirens but also fix the sheriff2 slot somehow.
- 316 comments
- 31 reviews
-
 Absolutely love this model. Everything works great for the most part except the gauges. They seem to be this odd red, black and white color. Not sure why either. I added this as an add on and didn't replace any police model. I copied the sections of carvariations and vehicles.meta that referred to sheriff2 and just swapped the name. They're currently in the christmas2 patch file. Everything worked fine but these gauges. Any suggestions?
- 87 comments
- 23 reviews
-
-
- 1
-
-


