
Sebo
Members
-
Joined
-
Last visited
Files posted by Sebo
-
This is a small standalone tool that allows you to convert outfits. You can turn any EUP outfit (preset or created by yourself) into the LSPDFR outfit
format and also UltimateBackup, so you can always equip the AI with the same clothes as you.
A Windows PC with the latest updates.
EUP/LSPDFR/UltimateBackup (at least 2 out of 3, otherwise the tool would be useless for you.)
Extract the file wherever you want and run it. Paste in the config lines from one of the 3 outfit formats (See screenshots). Locations for those are down below. Copy the entries from the converted formats and paste them in the corresponding config file.
EUP outfits:
Grand Theft Auto V\Plugins\EUP\wardrobe.ini for outfits that you have created using EUP menu or Grand Theft Auto V\Plugins\EUP\presetoutfits.ini to convert premade outfits LSPDFR outfits:
Grand Theft Auto V\lspdfr\data\outfits.xml or if you are using EUP:FR (Ultimate): Grand Theft Auto V\lspdfr\data\custom\ and then whatever agency. UltimateBackup:
Grand Theft Auto V\Plugins\lspdfr\UltimateBackup\DefaultRegions.xml or Grand Theft Auto V\Plugins\lspdfr\UltimateBackup\CustomRegions.xml
Disclaimer: Yes I know that VirusTotal is showing that a few (3/60) Antivirus vendors flagged it. It is obviously a false positive and I've submitted the file to all
kinds of vendors including Microsoft for a manual check. I will happily provide Cyan or LCPDFR.com staff with the source code for manual review to
prove that it is indeed safe.
If you still don't trust it for whatever reason, feel free to use Microsoft's Sandbox (comes free with Windows 10 or from the Microsoft Store) and run it
from there.
- 14,045 Downloads
- 30 Comments
Updated -
What does this plugin do? This plugin adds a realistic body cam overlay and also plays the sound every 90 seconds (by default, can be configured).
You can change:
The time between the beeps The serial number in the overlay The model text in the overlay The logo and sound A manual toggle key to activate/deactivate the overlay The general overlay scale The date If it works in every view or first person only
A legit copy of Grand Theft Auto V RAGE Plugin Hook
Installation:
1. Copy the files from the .zip into your Grand Theft Auto V\Plugins\ folder.
2. Check the .ini file in Grand Theft Auto V\Plugins\BodyCam\ and adjust the settings and keybinds to your liking.
3. Load the plugin via the RAGE Plugin Hook settings or ingame via the console and enjoy 🙂
How to use the custom logo/sound:
Logo: Place a .png with the logo of your choice (and preferably transparent background) in the Grand Theft Auto V\Plugins\BodyCam\ folder and name the file "custom.png".
Sound: Place a .wav file with the sound of your choice in the Grand Theft Auto V\Plugins\BodyCam\ folder and name the file "custom.wav".
Don't go too crazy with the logo/sound files and keep them as small as possible in terms of file size. Larger sizes might cause issues/crashes.
If you want to stay up to date on the development of my plugins, you can check out my Discord server at the link below.
https://discord.gg/MSW6RPp
If you need help with GTA or LSPDFR you can stop by at our LSPDFR Fans Discord server.
https://discord.gg/HGFwdyB
Disclaimer: We are in no way affiliated with Axon.
- 173,808 Downloads
- 168 Comments
Updated -
For all vehicle creators/modelers: I've included a documentation file, in case you want to make a compatible vehicle, where people can toggle the weapons in a gunrack. It's not complicated at all, and if you upload a vehicle with this feature, please send me a message so I can put a link up on this download page 🙂
This plugin allows you to store your Carbine Rifle, Shotgun, SMG, as well as Body Armor and Fire Extinguisher in your police car, and also to retrieve it.
It does NOT require compatible vehicles, however, they will add additional features, like seeing your weapons appear/disappear from the gunrack.
Features:
Store your Carbine Rifle, Shotgun, SMG, fire extinguisher and armor in your patrol vehicle. Retrieve the same from either inside the vehicle, or from the outside. Stand near the driver door and press the key to retrieve your weapons, stand near the trunk and press the key to retrieve your armor + medkit and/or your fire extinguisher Includes some fancy animations Customizable attachments for the weapons Customizable keybinds
Installation:
Put the .dll and the .ini into your "Grand Theft Auto V\Plugins\" folder.
Make sure to take a look at the .ini file to set your name and preferred keybind.
You have to sit in a Police car to store and retrieve your rifle/shotgun.
It does not matter whether it's a default police car, a replacement, or an addon, as long as you added the Police car correctly.
It works with the Carbine Rifle(MK2) and PumpShotgun, which come with an equipped flashlight upon retrieving.
Disclaimer:
Do NOT upload or redistribute without my written permission.
This includes private sharing or uploading to any other website.
And here's a link to my Discord server, where you'll find information about the current state of development for my plugins, and you'll get early access to beta builds:
https://discord.gg/RbSGF2d
The first compatible vehicle. Made by @panoszaf. Thank you 🙂
Thanks to FirstThirtyMinutes for showing the plugin in action!
- 23,058 Downloads
- 135 Comments
Updated -
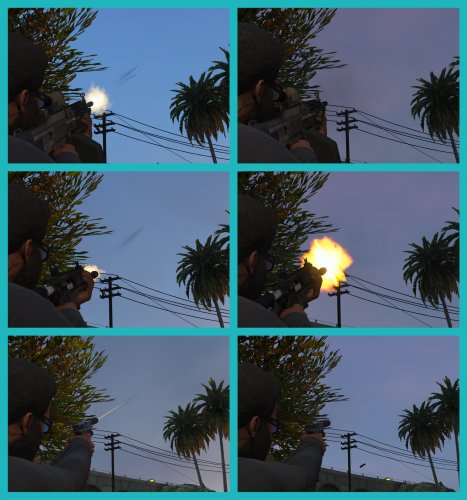
This .meta removes the bullet tracer effect that occurs when shooting with any gun.
NOTE: I recommend making a backup of your weapons.meta, just in case something goes wrong.
If you have made any changes to your weapons.meta file, for custom weapons or whatever, make sure to redo those changes to the .meta file that I provided
Installation:
INSTALLATION FOR UNMODIFIED WEAPONS.META:
1. Open OpenIV
2. Navigate to \mods\update\update.rpf\common\data\ai
3. Replace the weapons.meta with the one provided in this download
4. Enjoy.
INSTALLATION FOR USE WITH THE FOLLOWING SOUND MOD:
https://www.gta5-mods.com/weapons/realistic-shootouts-enhanced-0-9-beta-gtav-weapon-sound-mod
1. Download No Bullet Traces RSE.zip
2. Open OpenIV
3. Install the linked sound mod
4. Navigate to \mods\update\update.rpf\common\data\ai
5. Replace the weapons.meta with the one provided in this download
6. Enjoy.
INSTALLATION FOR USE WITH THE FOLLOWING SOUND MOD:
https://www.gta5-mods.com/weapons/gun-sounds-overhaul-2-0
1. Download No Bullet Traces GSO.zip
2. Open OpenIV
3. Install the linked sound mod
4. Navigate to \mods\update\update.rpf\common\data\ai
5. Replace the weapons.meta with the one provided in this download
6. Enjoy.
Disclaimer:
Do NOT upload or redistribute without my written permission.
This includes private sharing or uploading to any other website.
- 5,015 Downloads
- 6 Comments
Submitted