


Raxous
Members
-
Joined
-
Last visited
Everything posted by Raxous
-
 Hi, I think an update is required. It crashes. The crash is 100% related to the files.
- 85 comments
- 19 reviews
-
 Thanks for the reply, and your presumption that 27 is used for all cars is wrong. Actually I have not yet seen 27 to be used for the cars I have. Most of them are 22ng. So... Thats that.
 -
-
Hi, which dlcpack is used for this? Where to install?
-
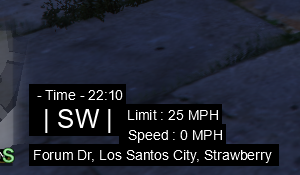 TLDR: If you dislike the position of the Text interfering with your other stuff (notifications) read on and do step 2 (alter the .ini with step 3). Hi there. So I have installed the most recent version of this. But I'm afraid it's poorly designed when it comes to the UI locations. Fortunately, I am not a Computer noobie and was able to correct that by altering the .ini file. For everyone else who finds that the UI as it is stock in the download is interfering with his notification window, or with opened up menu windows alike e.g. CompuLite (by BejoIjo - https://www.bejoijo.com/) and others... Heere is a simple fix to that. You can move the interface wherever you want it. But I find it most convenient to be located where I used to have PLD so i think that actually is the best place for this text plugin to be positioned as well. For that reason, I recommend the author: To programm the text position, like PLD does, to be connected to the MiniMap so that it's on the right side of the MiniMap. Also, in a way that there is a secondary programming for the maxed out minimap setting for when you zoom the minimap out completely. Currently, it is blocking that option. This might interfere with LSPDFR as it like to zoom max out for showing the callout locations. (I suggest the author and until he does everyone else) To alter the X;Y coordinates of the UI parts in the .ini file. (RageShowMyLocation.ini). Mind that X is the horizontal path and Y is the vertical one. You may use whatever you like. I don't know if that depends on the screen size and resolution, though. You have to check that out. I will post what worked for me (what numbers) You can use mine or test out and find your best spot. You can look on the positioning. To get a picture of how it works, check out the setting for the cords, which are located in the upper left corner by default. I recommend turning those off later on. Fix: pos_x=310 pos_y=1000 pos_x_heading=310 pos_y_heading=955 pos_x_time=310 pos_y_time=940 pos_x_playerspeed=400 pos_y_playerspeed=980 pos_x_speedlimit=400 pos_y_speedlimit=960 Basically I added 265 to each element in the Y coordinate (mind the upper end of the UI is 0 not the other way around. It's kind of the other way around as usual. So adding to the Y will place it lower and lower vertically.). Then to get it around the Minimap I added 80 to the X coordinate to move it a bit to the right. It's not a perfect match with the PLD setting but it's around that place now (mind unlike the Y coordinate the X is added from left to the right, just as one would expect. i.e. adding the number up makes it go further to the right). When altering the settings you can just ALT+TAB out of GTA V and go to the .ini file and alter the numbers. In fact you can even have the .ini open the whole time. Just press CTRL+S each time after you changed something. Go back to GTA V and use the RagePluginHook Console. Terminate the plugin (command: TerminatePlugin and select this plugin in the offers and press TAB to input the selected offer and then Enter.) Then change what you want in the .ini or if you already did change something use the command LoadPlugin with the console and select this plugin and you should see the changes. You can repeat that until you like the result.
- 200 comments
- 22 reviews
-
-

- 1
-
-
Yes, but PLD does not support speed limits showing as far as I know. And if you like to have a realistic traffic policing experience with speed radar, not knowing the exact speed radar for that road is going to make that impossible. Looking out for speed signs might work on some places in San Andreas but on most roads there is not a speed limit sign past every intersection like maybe it should be. Furthermore you also can not rely on Rockstar to have implemented speed limits acording to California's Traffic code. The Route 1 I believe it is near Fort Zancudo (on the bridge and in tunnel) seems to have set 70 mph or at least that is what most drive there. But according to California's traffic Code intel that I Googled an undevided two-lane road should never have a higher speed than 55 mph. Now yes there on the bridge is a division of some sort, so one might say that is a divided two-laner. I'm not a California law student so I don't know how that particular sentence used "division" is defined elsewhere in the general parts of the code and I'm not going to read thousands of paragraphs of California's traffic code to learn the speed limits for GTA V LSPDFR purposes 😄 So this is the plugin to go with instead of PLD from this day on forward for me, ever when I want to do speeding police. Off course, if PLD would add a Speed Limit and maybe the player's speed info to its UI I'd use that instead. Cause it looks a bit better in my eyes, just a bit. So there are reasons why to use this instead of PLD.
- 200 comments
- 22 reviews
-
Hey boy this doesn't Work you need to create it in the .png otherwise we cant use it to import it with Spark IV
- 1 comment
- 1 review


